Category Archives: Recipes

Chicken Quesadillas On A Weber Gas Grill

Making chicken quesadillas on a Weber gas grill is so easy that I hesitate to tell you how to do it…but I’m going to tell you anyway!

Grilled chicken breasts

Start by grilling a few boneless, skinless chicken breasts using your favorite rub or marinade. If you don’t have a favorite, try Slap Yo’ Daddy BBQ Jailbird Chicken rub. Grill the breasts over MEDIUM heat to 160-165°F, let rest for a few minutes until you can handle the meat, then cut or shred into bite-sized pieces. Continue reading Chicken Quesadillas On A Weber Gas Grill

Smashed Burgers On A Weber Gas Grill

Two-patty smashed burger with American cheese

I had heard of smashed burgers in the past. I’ve eaten at a fast-food chain called “Smashburger” but didn’t think much of it. When I was a teenager, I worked the grill at Wendy’s and part of the process was to smash the burgers on the flat-top using a trowel-like spatula. And yes, I am aware that the venerable Steak ‘n Shake has been smashing Steakburgers on the flat-top since 1934.

But it wasn’t until The Virtual Weber Bulletin Board member BFletcher started asking about sturdy spatulas for making smashed burgers that I started to investigate these flattened meat marvels. What caught my attention was an article by J. Kenji López-Alt on Serious Eats about making ultra-smashed cheeseburgers. Armed with this info, I successfully made delicious smashed burgers using my Weber gas grill. Let me show you how.

Continue reading Smashed Burgers On A Weber Gas Grill

Meatloaf Burgers Adapted To The Weber Gas Grill

Meatloaf burger on toasted sesame seed bun with burger sauce

I recently made meatloaf burgers using a recipe from Cook’s Country magazine. In the Cook’s recipe, you make a meatloaf mixture using typical ingredients, then form into patties and sear in a non-stick skillet on the stove top over medium-high heat for 3 minutes per side. Once you’ve got a crusty exterior on the patties, they move to a wire rack over a rimmed baking sheet pan in a 350°F oven and cook for another 15-20 minutes until 160°F internal temperature.

I adapted this recipe to the Weber gas grill by searing the patties in a cast iron skillet over medium heat on the grill, then moved them to a wire rack over a rimmed baking sheet pan on the grill and continued cooking until reaching 160°F internal temperature.

Continue reading Meatloaf Burgers Adapted To The Weber Gas Grill

Chicken Kebabs on a Weber Gas Grill

Chicken kebabs are a delicious and healthy choice when grilled on a Weber gas grill. They’re fairly easy to prepare and cook, and your guests will be impressed because kebabs are a specialty that you don’t often find on summer cook-out menus.

Chicken kebabs on Weber Summit gas grill

This recipe is inspired by one published by America’s Test Kitchen in 2002.

Makes 12 chicken/veggie kebabs plus extra chicken-only kebabs.

Continue reading Chicken Kebabs on a Weber Gas Grill

Grilled Teriyaki Pork Tenderloin

Grilled teriyaki pork tenderloin

Grilled teriyaki pork tenderloin is a favorite in our household. It’s easy to make, it tastes great, and it’s as lean and healthy as boneless, skinless chicken breast.

I like to use two types of teriyaki together when grilling pork tenderloin. I marinate the meat using Lawry’s Teriyaki Marinade before cooking, then glaze it with the sweeter JES Teriyaki Sauce toward the end of cooking.

Teriyaki marinade and finishing glaze

Start with a fresh pork tenderloin weighing 1 to 1.5 pounds. Trim any silverskin and excess fat. Place tenderloin in a Ziploc bag and add 1/3 bottle of Lawry’s Teriyaki Marinade. Squeeze out excess air, seal the bag, and massage the tenderloin through the bag to make sure it’s well coated. Refrigerate for at least 30 minutes or up to 2 hours, turning the bag several times so the meat marinates evenly.

Tenderloin marinating in Ziploc bag

When ready to grill, remove tenderloin from bag and pat with paper towels to remove most of the marinade. Too much marinade and the meat will steam on the surface, inhibiting browning. To promote even cooking, fold the thin end of the tenderloin back over onto itself about 2-3 inches and tie with kitchen twine.

Preheat the gas grill on HIGH for 10 minutes, then clean the grates with a grill brush. Reduce heat to MEDIUM.

Spray both sides of tenderloin with non-stick cooking spray. Grill for 2 minutes, then use a spatula and tongs to loosen the meat from the grate and turn it over. Grill for another 2 minutes on the second side. Repeat for another 2 minutes on each side.

Now that you’re 8 minutes into grilling, start glazing the meat with JES Teriyaki Sauce using a basting brush and continue turning and basting every 2 minutes. Also, now’s the time to start checking internal meat temp with an instant-read thermometer.

Grilling and glazing the tenderloin

Keep grilling, turning, and basting until the tenderloin reaches an internal temperature of 135-140°F. Move tenderloin to a rimmed baking sheet, cover with foil, and let rest for 5 minutes before slicing.

Interior view of teriyaki pork tenderloin

This teriyaki pork tenderloin is moist, tender and delicious when cooked to perfect doneness on a Weber gas grill! Serve with warmed JES Teriyaki Sauce on the side, along with sticky rice and your favorite side dishes.

Grilled Ribeye Cap Steaks

When you’re out shopping and come across a special cut of meat—buy it. That’s what I did when I spotted USDA Prime ribeye cap steaks at Costco.

USDA Prime ribeye cap steaks

The ribeye cap, or spinalis dorsi, is probably the most flavorful part of the cow. You’ve probably enjoyed it when eating prime rib—it’s that highly marbled outside edge that surrounds the large center eye of the prime rib. Here it’s been separated from the prime rib roast in a single piece and cut into narrow “steaks”.

Ribeye cap steaks seasoned with salt, pepper and granulated garlic

When grilling such a special cut, seasonings should be simple and used only to enhance the natural flavor of the meat. Kosher salt, black pepper, and granulated garlic are just the ticket.

Ribeye cap steaks go onto the grill

Preheat the grill on HIGH for 10 minutes, then scrub the grates with a grill brush. Turn the heat down to MEDIUM and place the steaks on the grill. Keep the lid open and turn the steaks every 60-90 seconds so they cook evenly on all four sides.

Ribeye cap steaks are almost done

Use an instant-read thermometer to check the internal meat temp. I grilled these steaks to 135-140°F for something between medium-rare and medium doneness.

Finished ribeye cap steaks

Once the meat is done to your liking, remove to a platter and let rest for just a few minutes to allow juices to redistribute within the meat. Finish with a sprinkle of sea salt or kosher salt to boost the flavor.

Inside view of ribeye cap steak

So soft, so tender, so delicious…that’s all I can say about these ribeye cap steaks. They were a real treat! If you have a chance to try them, do it. If you’re in the mood to splurge, you can order a whole ribeye cap from Snake River Farms.

Reverse Seared Porterhouse Steaks

The porterhouse steak is one of my favorites because it’s two steaks in one: the larger strip steak on one side of the bone and the smaller tenderloin steak on the other side of the bone. The strip has better flavor, but the tenderloin has better tenderness. The porterhouse steak is the best of both worlds!

I’ve grilled these steaks over direct heat for years with good results, but grilling indirect with a reverse sear at the end is all the rage these days, so I thought I’d give it a try with these two beauties. The process I followed comes from a recipe in Cook’s Country magazine.

Salted porterhouse steaks on wire rack

Place the steaks on a wire rack over a rimmed baking sheet. Pat dry with paper towels then sprinkle with kosher salt.

Steak about 60 minutes at room temperature

Steak registers 55 degrees internal temp

Let sit at room temperature until the steaks register an internal temperature of 55*F, about 60 minutes.

Applying olive oil to steaks

Steaks sprinkled with freshly cracked black pepper

Once the steaks hit 55*F, rub both sides with olive oil and sprinkle with freshly cracked black pepper.

About 45 minutes into the salting process, preheat your gas grill with all burners on HIGH for 15 minutes, then clean the grates with a grill brush. Turn one burner to MEDIUM LOW and turn off all the other burners. Adjust this one burner as needed to maintain about 300*F.

Steaks place next to medium low burner
Medium low burner is to the right of the steaks. Burners under the steaks are turned off.

Place the porterhouse steaks on the grill just off the edge of the fire, with the bone-end facing the lit burner. Cook the steaks to 75*F, about 10-20 minutes.

Turned steaks at 75 degrees internal temp

Flip the steaks, keeping the bone-end facing the lit burner, and cook to 95*F, another 10-20 minutes.

Remove the steaks from the grill. Turn all burners to HIGH and let the grill preheat for 5 minutes. (If you have a cast iron griddle or plancha, place it on the grill and preheat for 10 minutes.)

Put the steaks back on the grill (or griddle or plancha) and sear both sides until well browned to an internal temp of 120*F for medium-rare, about 4 minutes per side.

Steaks resting before serving

Remove steaks from the grill, cover loosely with foil and let rest for just a few minutes while getting the rest of your meal to the table.

Interior view of tenderloin portion
Interior view of strip portion

The indirect cooking process with reverse sear results in evenly done meat with minimal overcooked meat at the surface of the steak. The process is a little fussy and takes a bit more time versus the typical direct cooking process, but the results are worth it.

Double-Thick Bone-In Grilled Pork Chops

Double-thick, bone-in pork chops

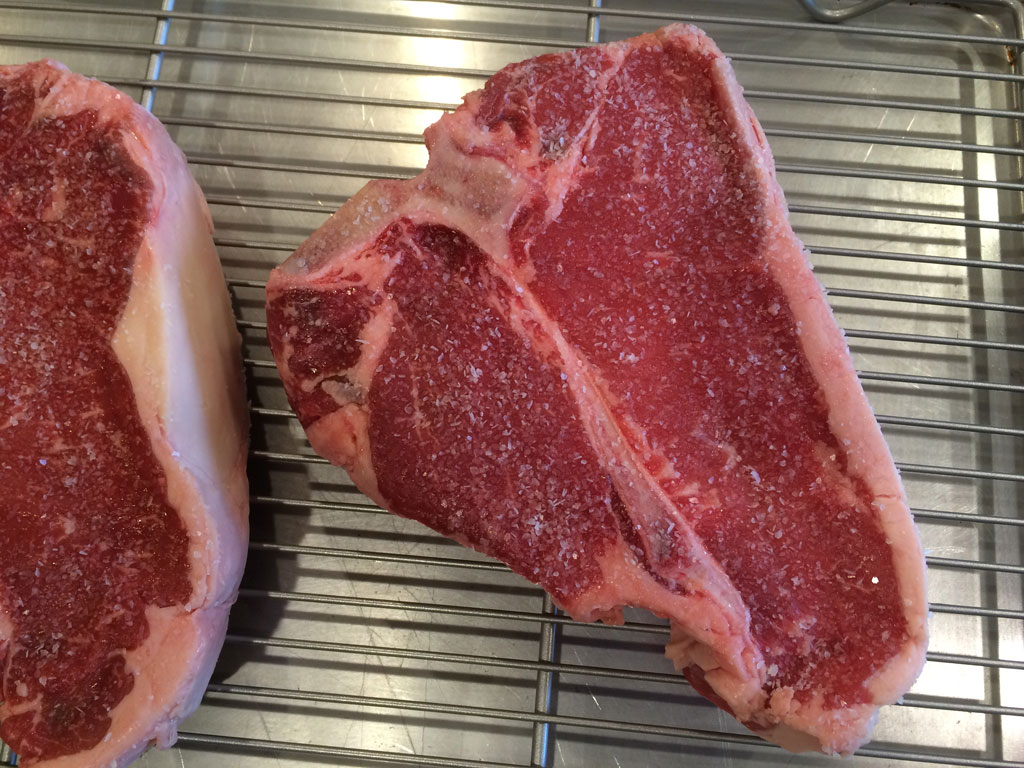
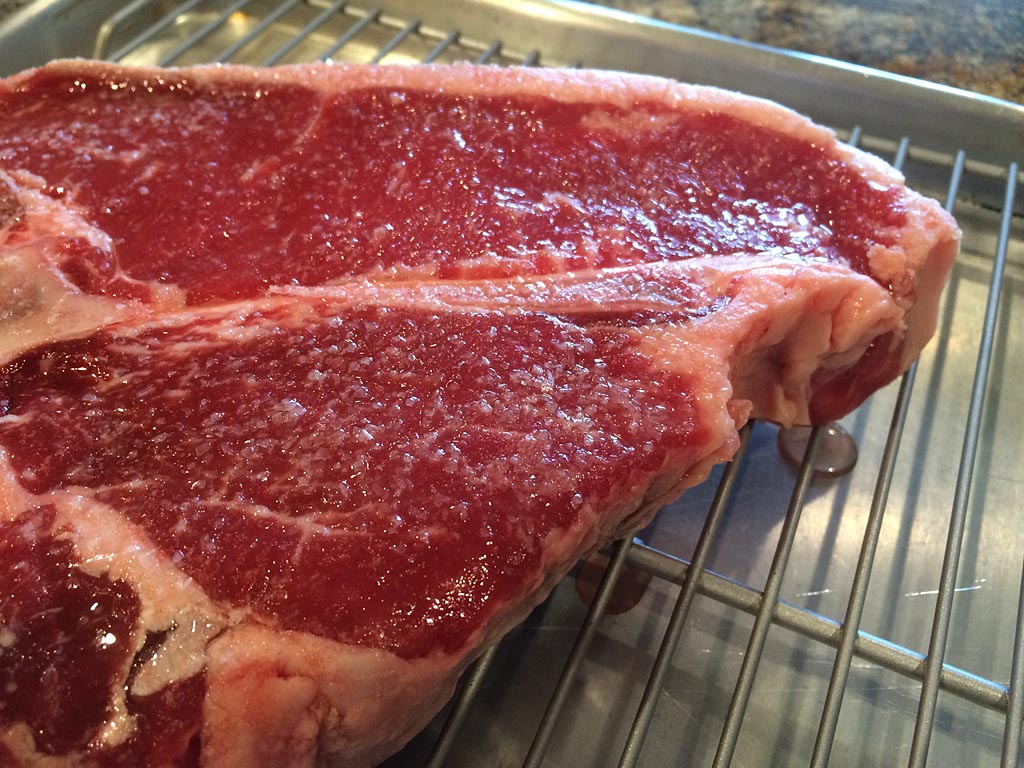
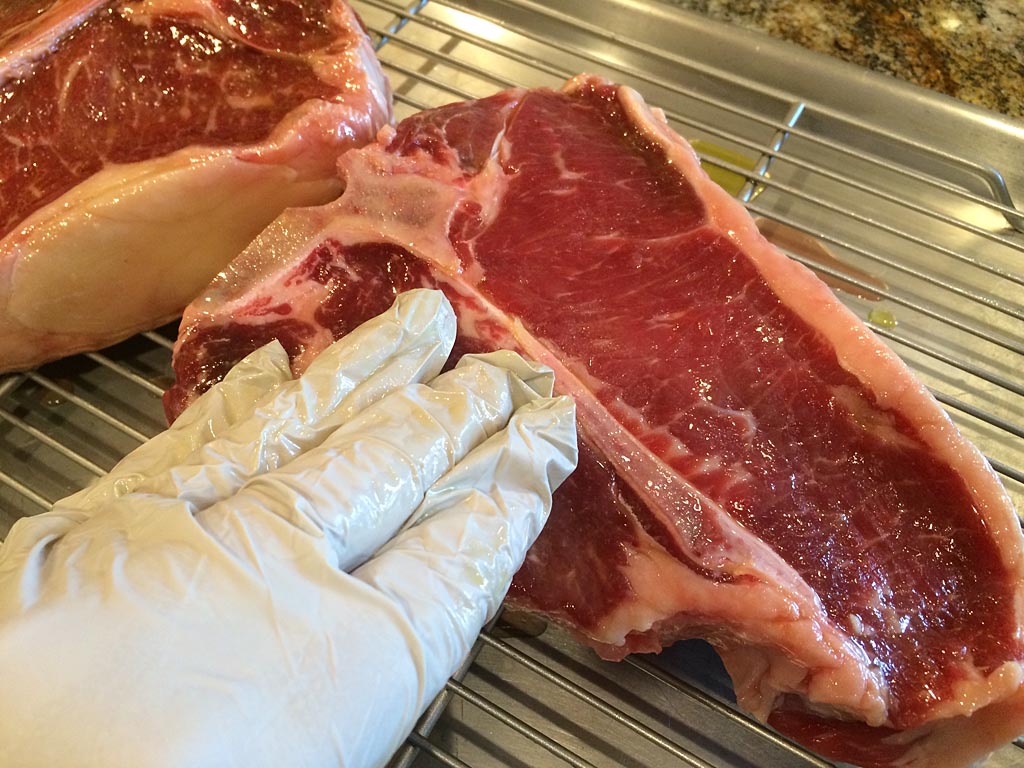
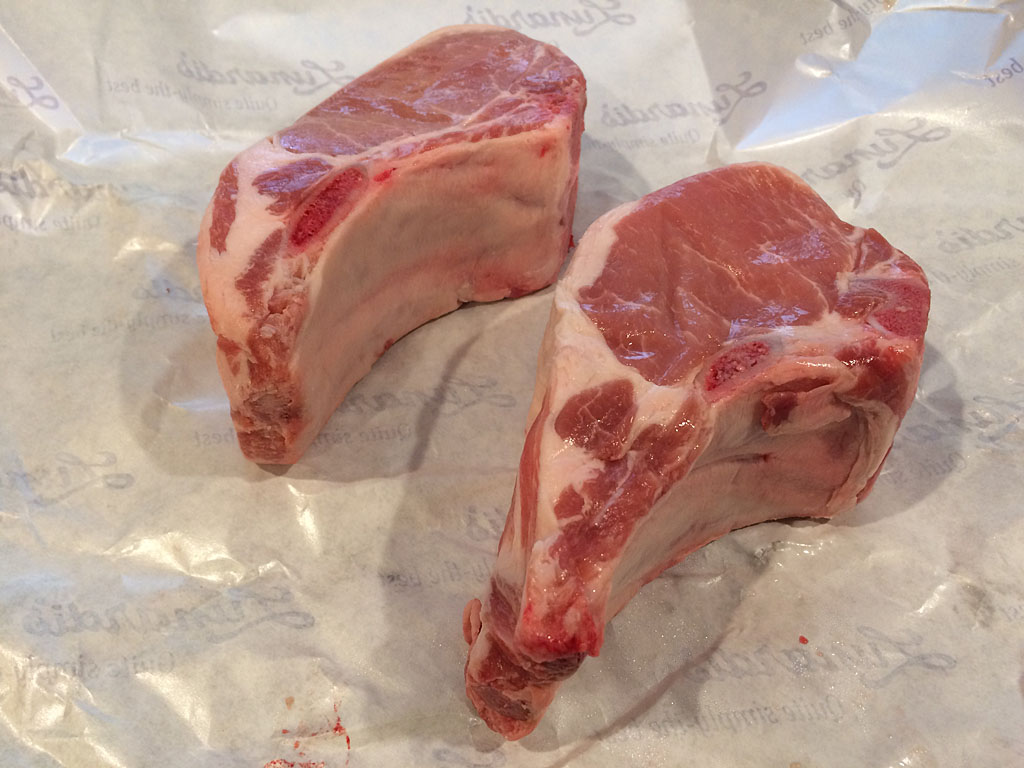
I spotted some beautiful, double-thick, bone-in Niman Ranch pork chops at a supermarket here in San Jose. I thought they’d be a real treat for my birthday dinner. What could be better than giving myself the gift of delicious, juicy pork?

Here’s how I grilled these chops on the Weber Summit 450 gas grill.

Rubbed pork chops

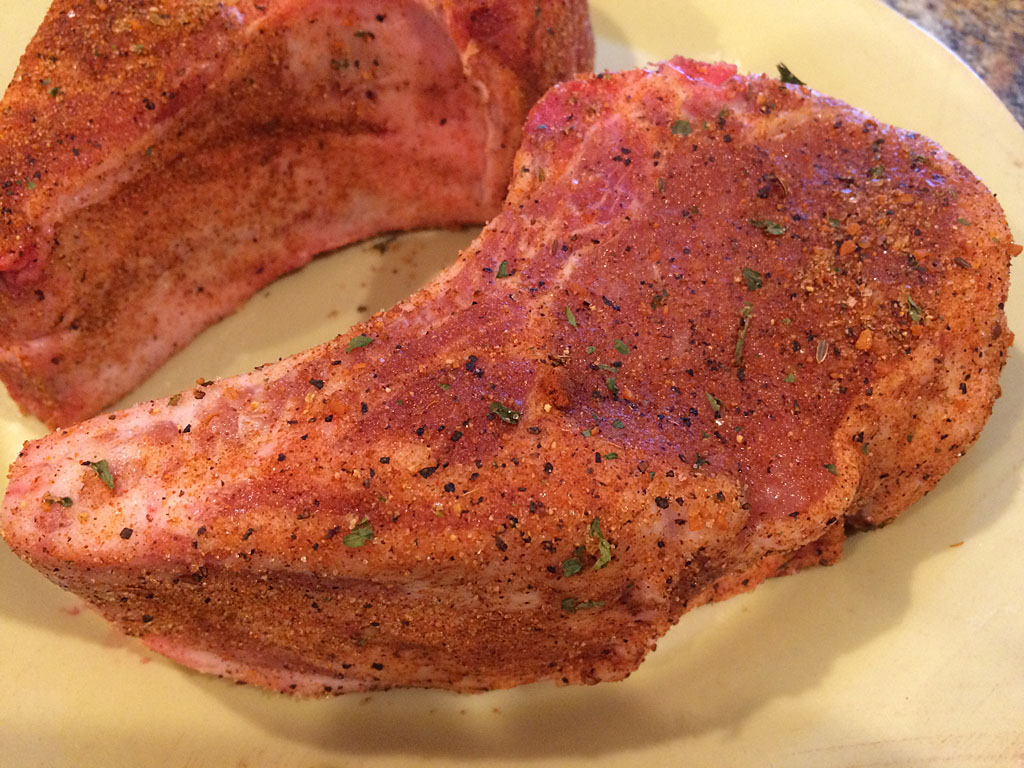
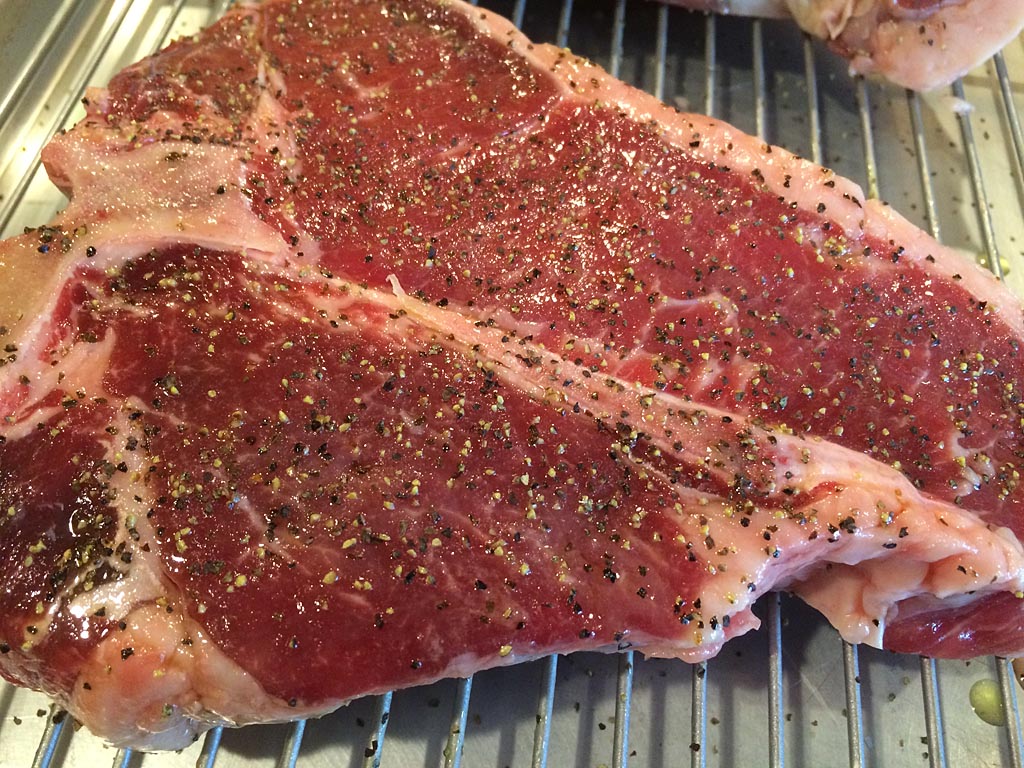
To prevent the chops from cupping during grilling, make a series of cuts around the edge of each chop through the fat just to the meat. Pat the chops dry with paper towels and apply Slap Yo’ Daddy All-Purpose Rub to all sides. Cover and refrigerate for 1 hour.

Preheat the grill on HIGH for 10 minutes. While the grill is heating, remove the chops from the refrigerator. Spray both sides with non-stick cooking spray.

Pork chop goes onto the grill

Clean the grates with a grill brush and turn the burners down to MEDIUM.

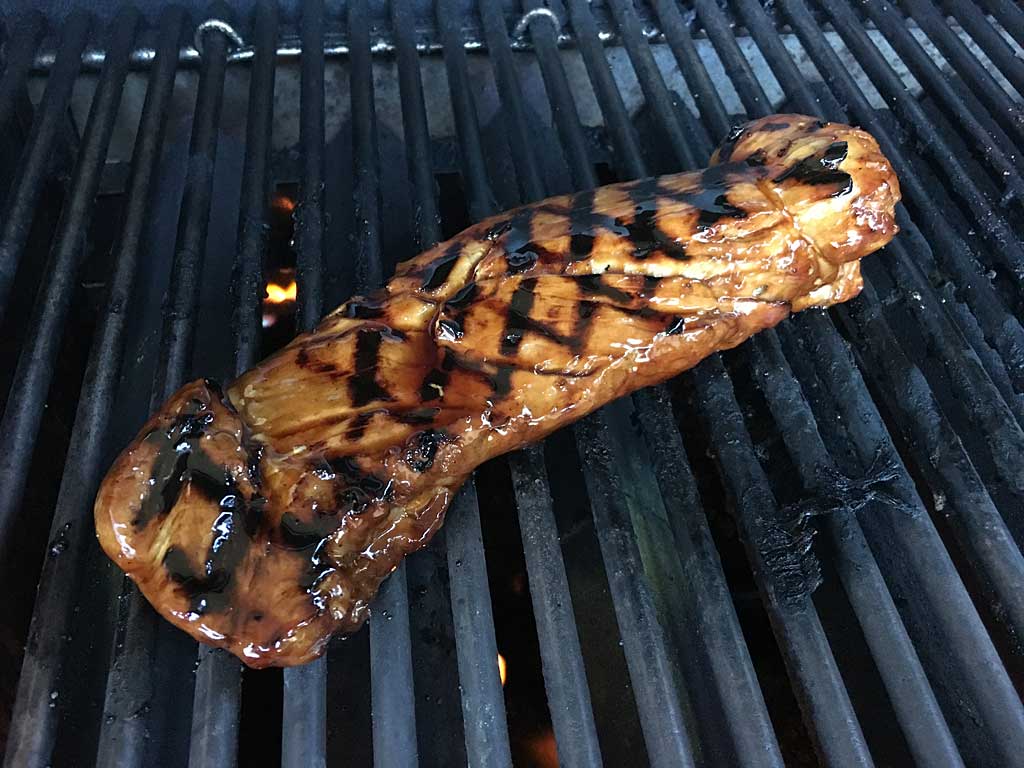
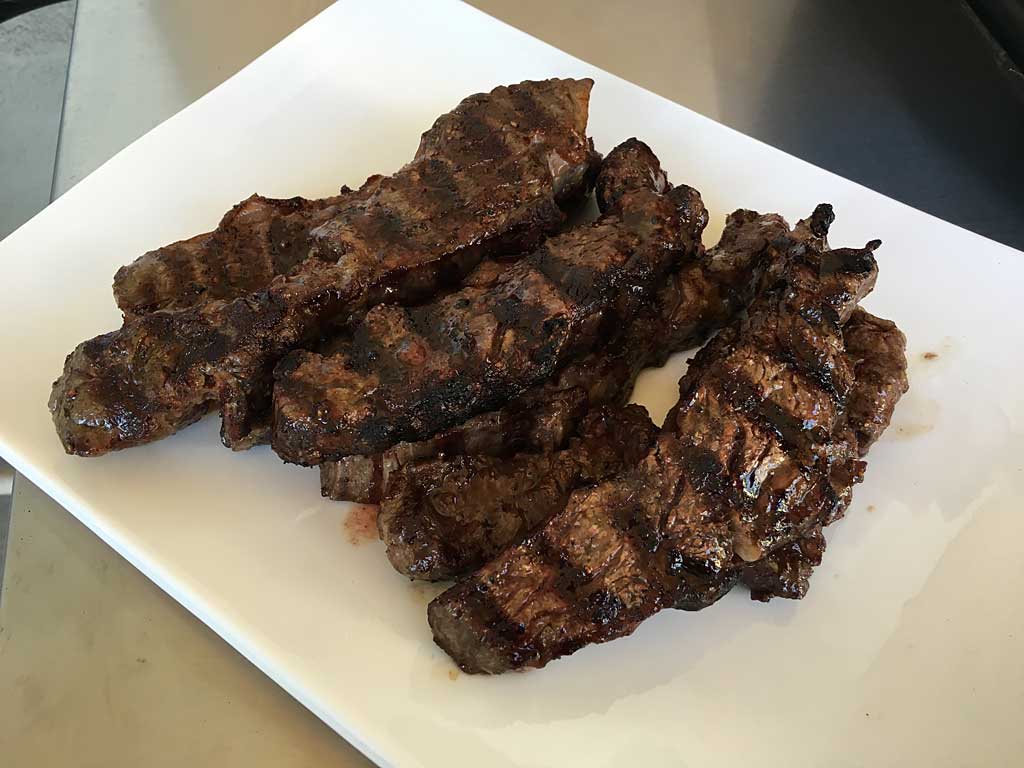
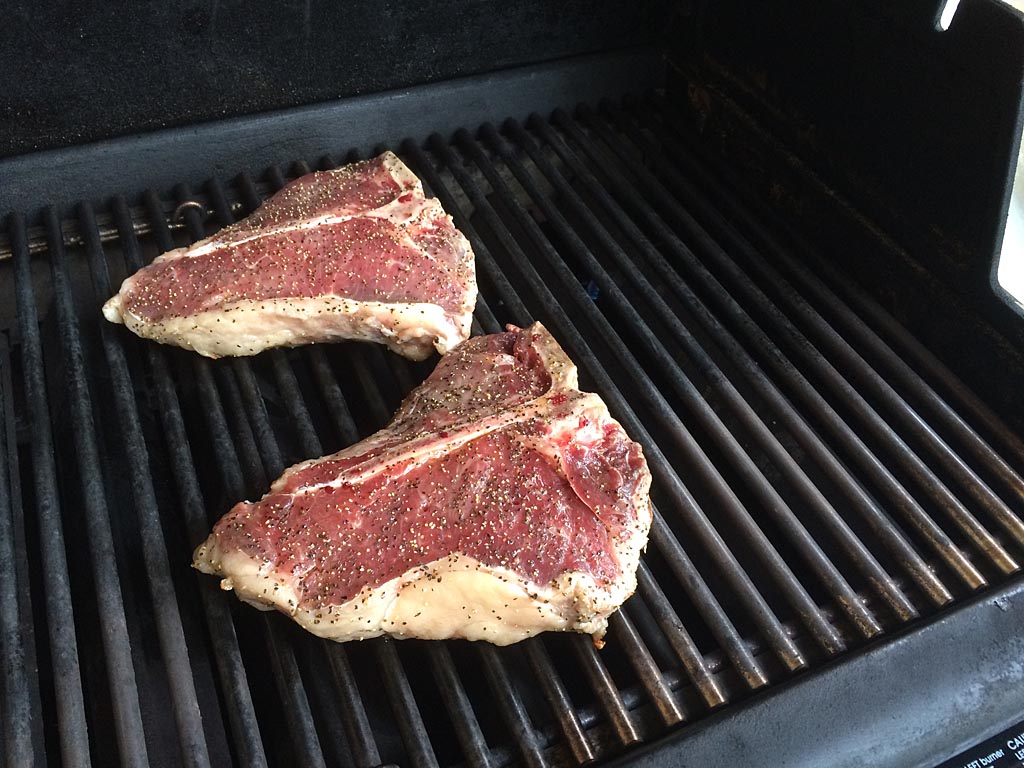
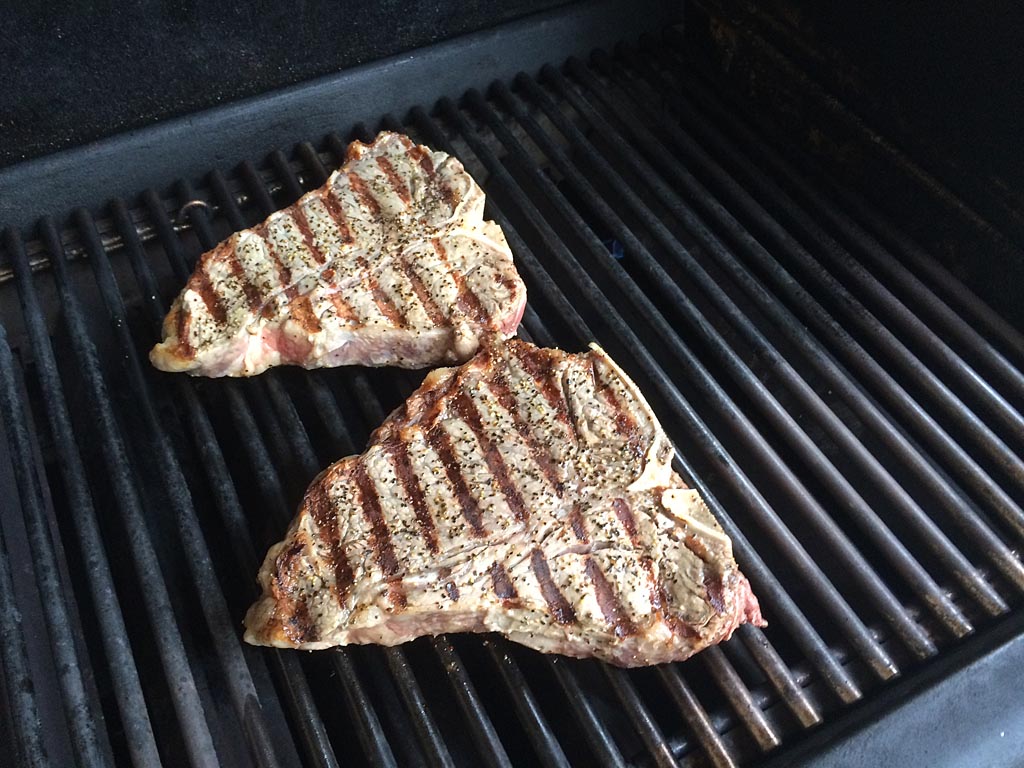
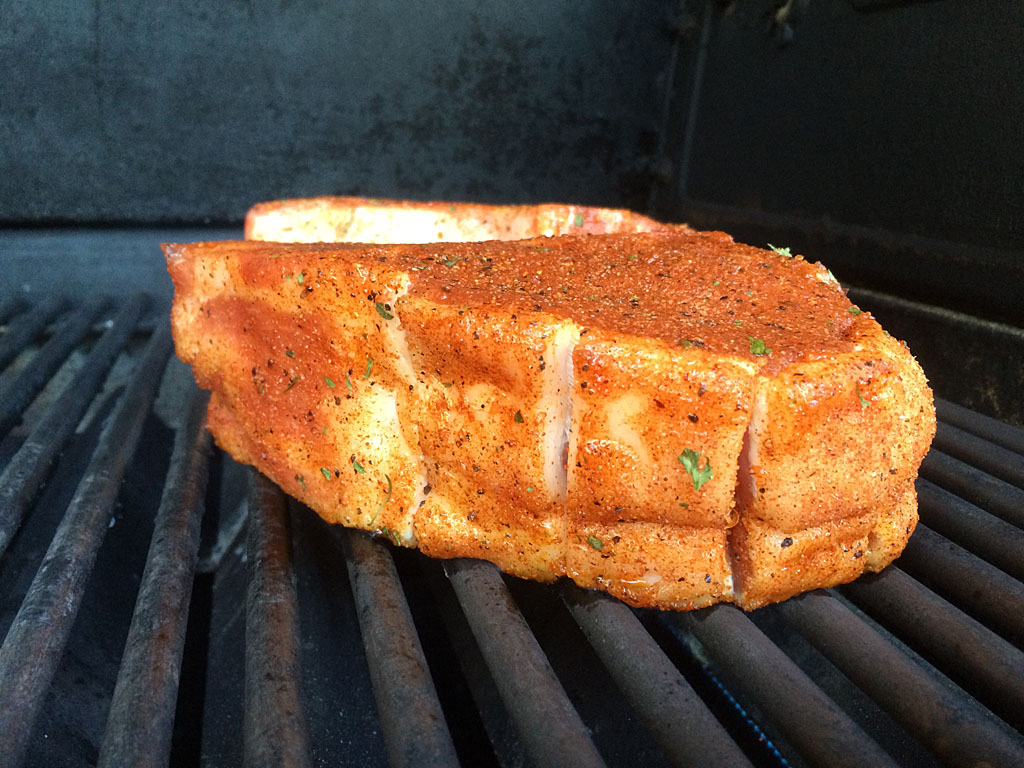
Place the chops on the grate. Cook 2-3 minutes on the first side. Use a spatula to help release the chops from the grate. Cook the second side for 2-3 minutes. Turn the chops back onto the first side, rotating 90 degrees to create diamond pattern grill marks. Cook 2-3 minutes, then repeat for the second side.

Watch the grill carefully for flare-ups during this initial searing process. The chops shown here had some nice fat around the edges that rendered and flared-up; just move the chops away from the flames if this happens.

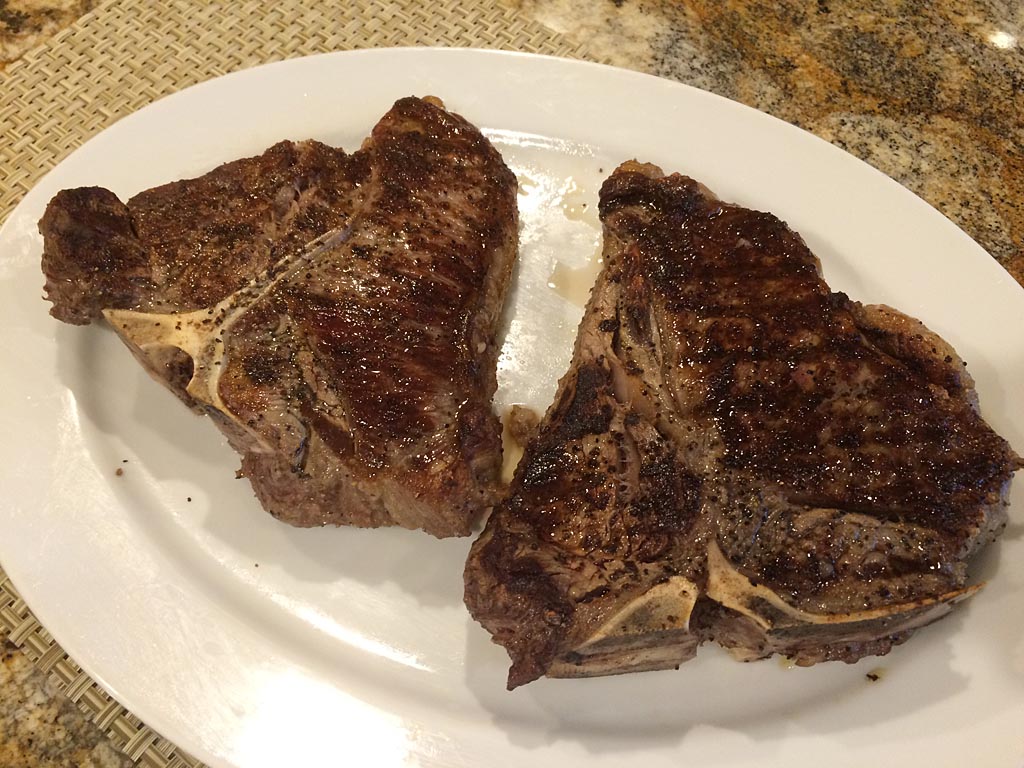
After 8-12 minutes of cooking, the double-thick chops are now nicely seared on the outside, but not even close to being done on the inside. They need to be cooked more at a lower temperature until perfectly done.

Seared pork chop ready for foil

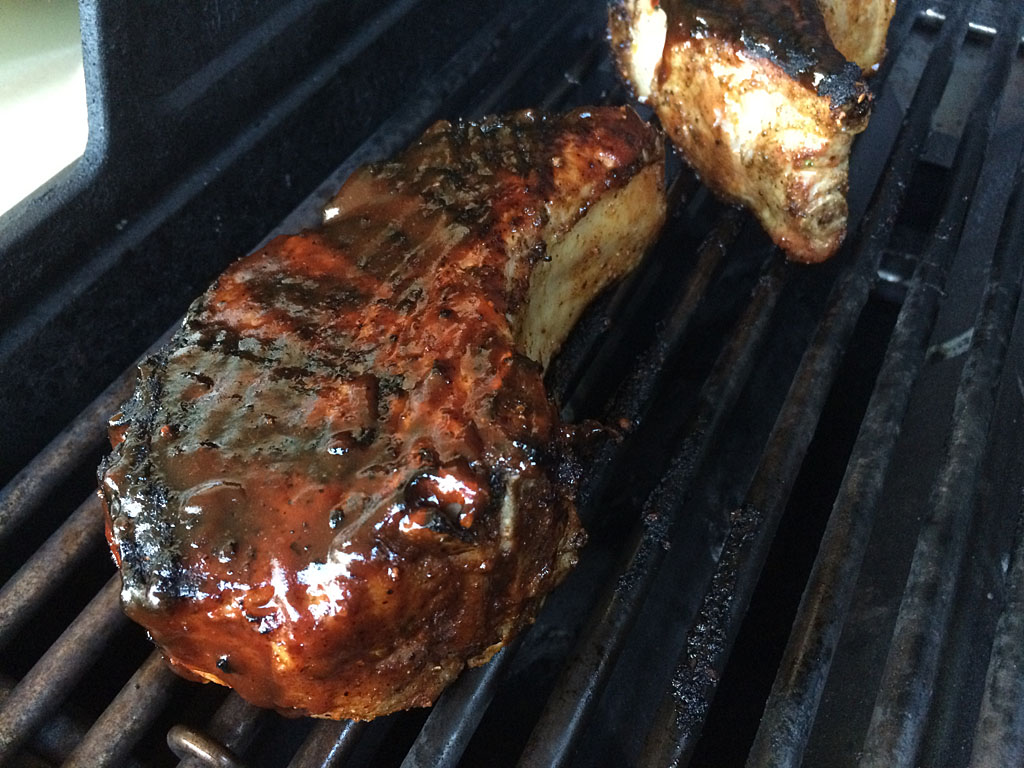
Use an instant-read thermometer to check the internal temperature of the meat. Apply a thin coat of barbecue sauce to both sides of the chops and wrap them in heavy-duty aluminum foil.

Setup the grill for indirect cooking at 350°F by turning some burners OFF and some burners to LOW or MEDIUM. Place the foil package over the OFF burner(s) and cook the chops until they reach an internal temperature of 140°F.

Opening foil to check internal temp

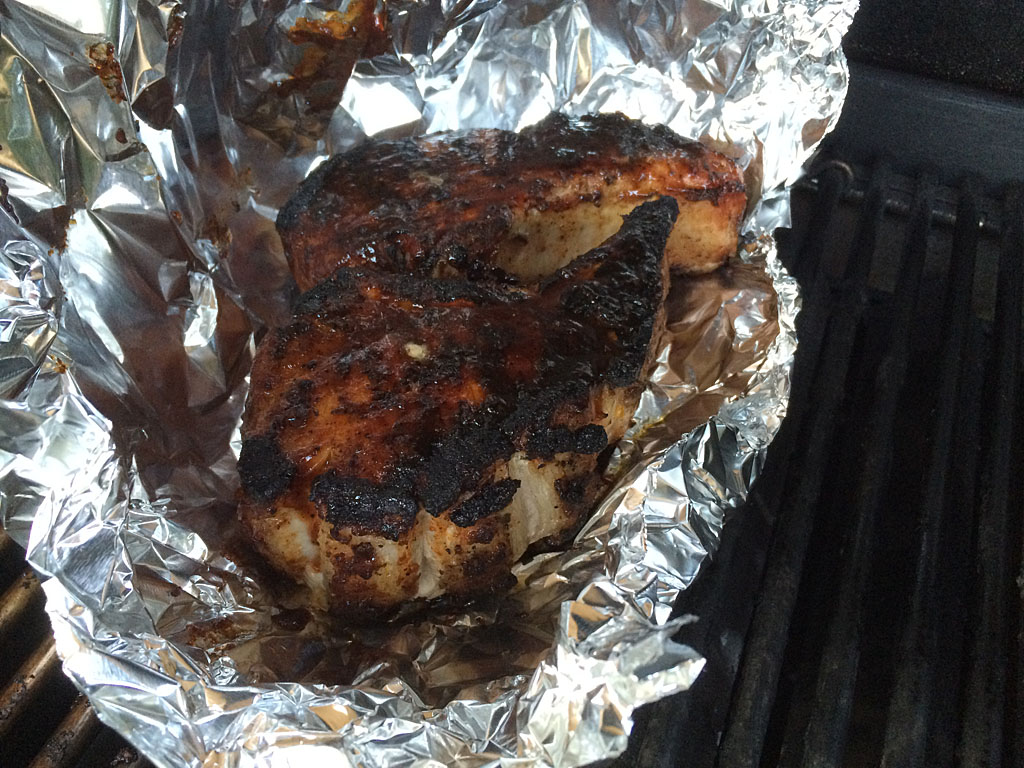
Open the foil every 5 minutes, check the meat temp quickly, then close the foil and the grill lid. While checking the temp, occasionally flip and turn the chops so they cook evenly.

The chops shown here were seared for about 10 minutes then cooked in foil for an additional 30 minutes and flipped/turned twice in the foil. Your timing will vary, of course, depending on your specific grill and the thickness and starting internal temp of your chops.

Chop resting on a plate after cooking

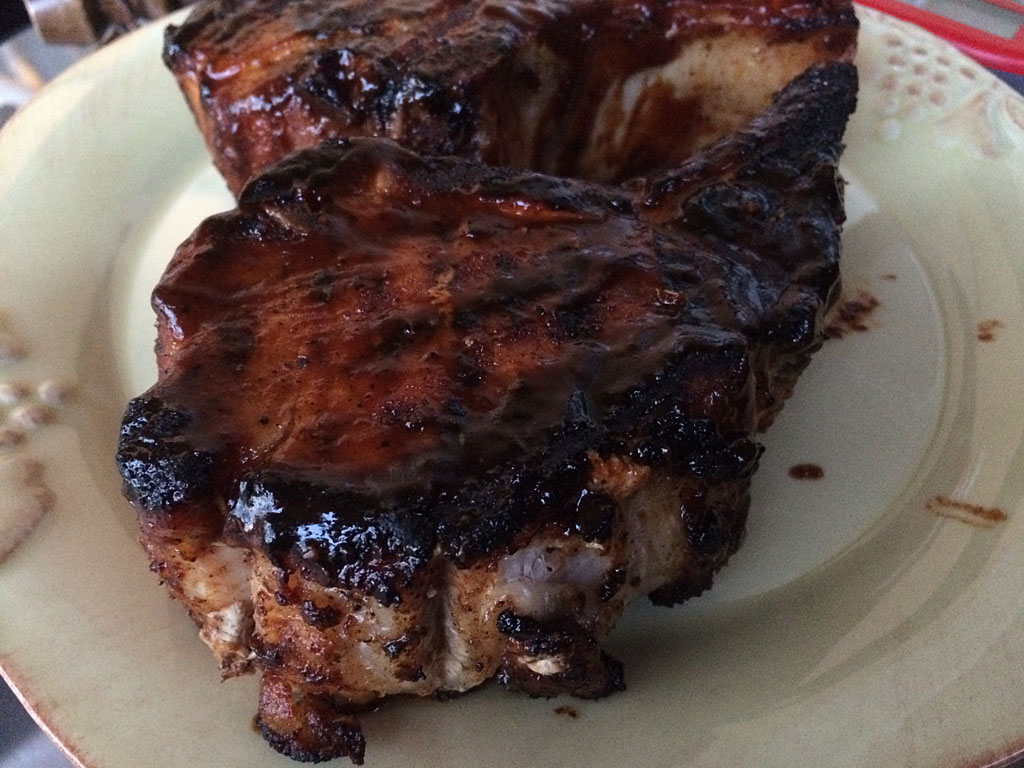
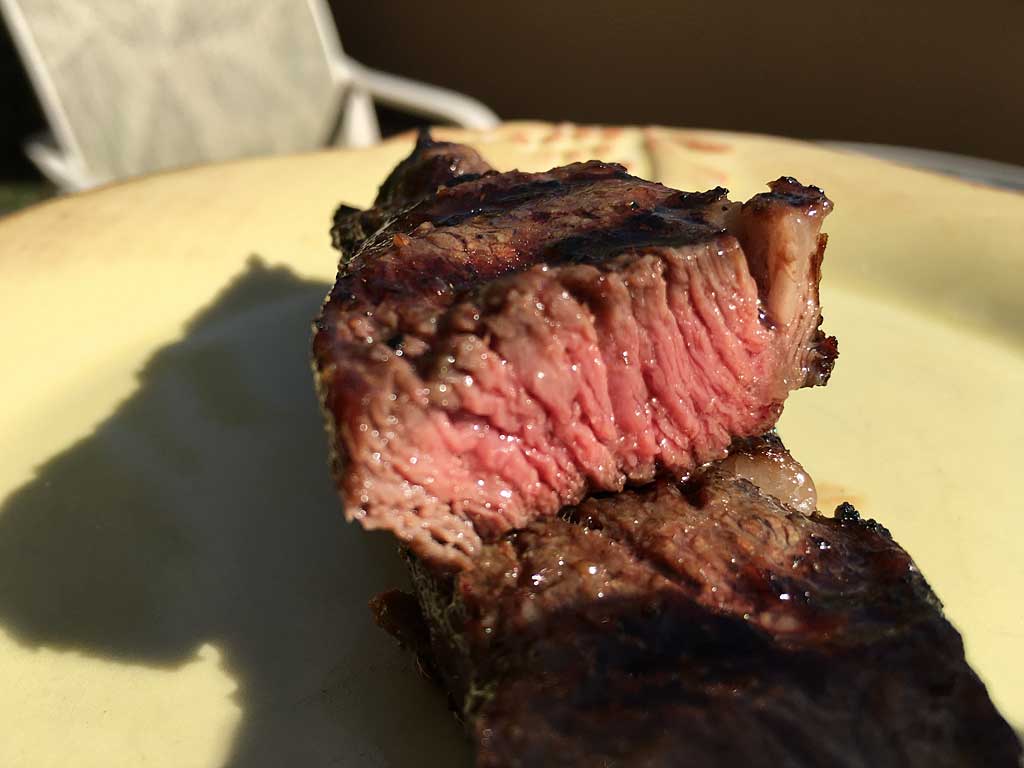
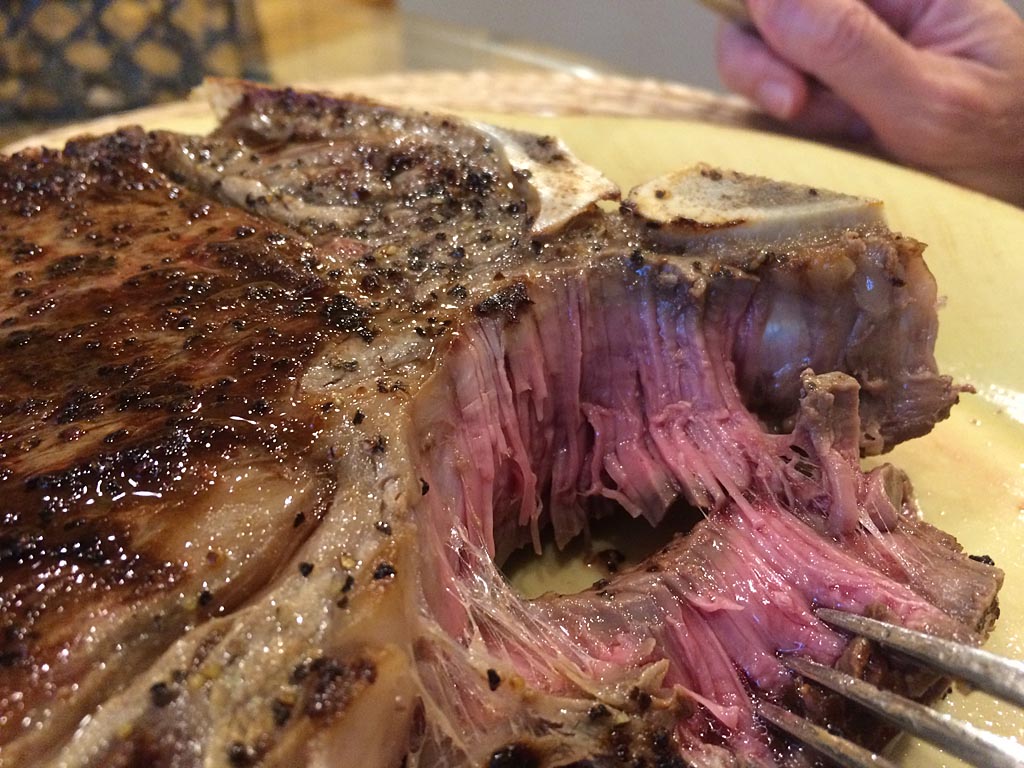
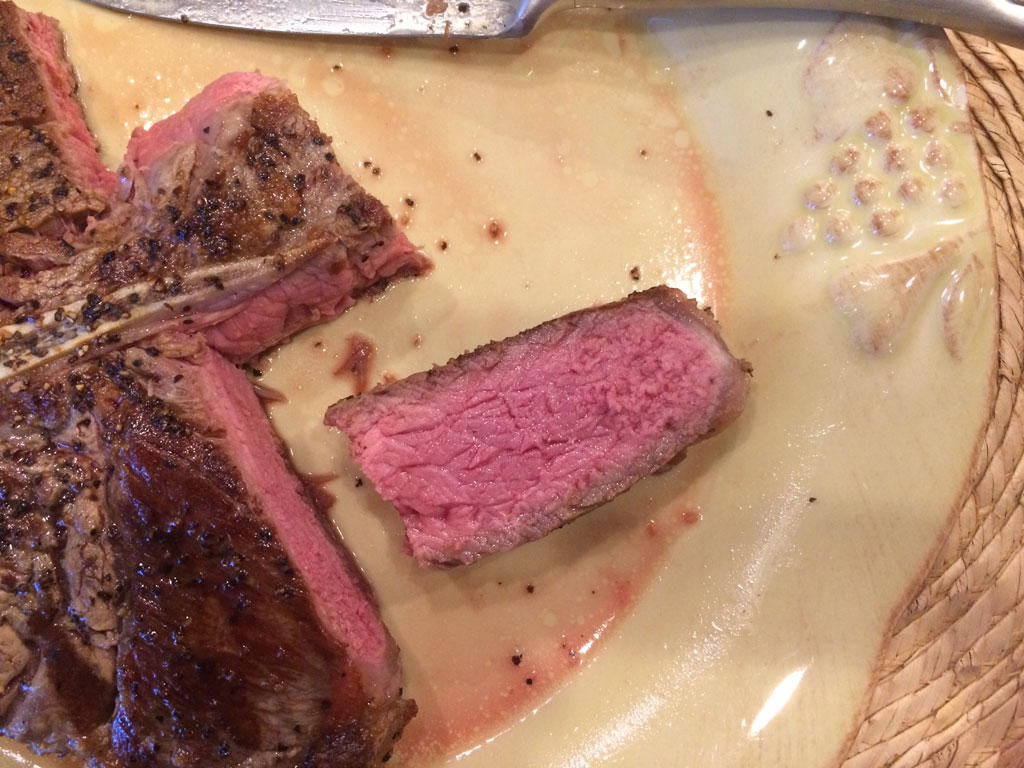
Once the chops reach 140°F, remove them from the foil and give them another thin coat of barbecue sauce. Remove the chops to a serving plate and let rest for 5 minutes while getting the rest of your meal to the table.

Plated pork chop with mashed potatoes and apple sauce

Pork chops al fresco by candlelight

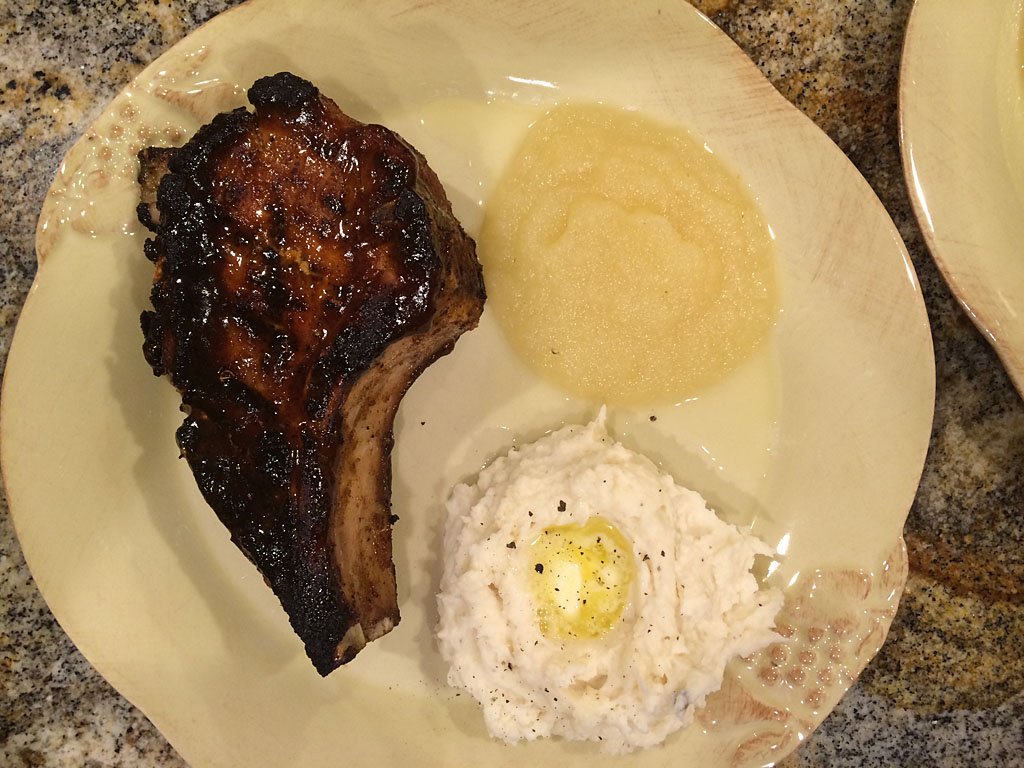
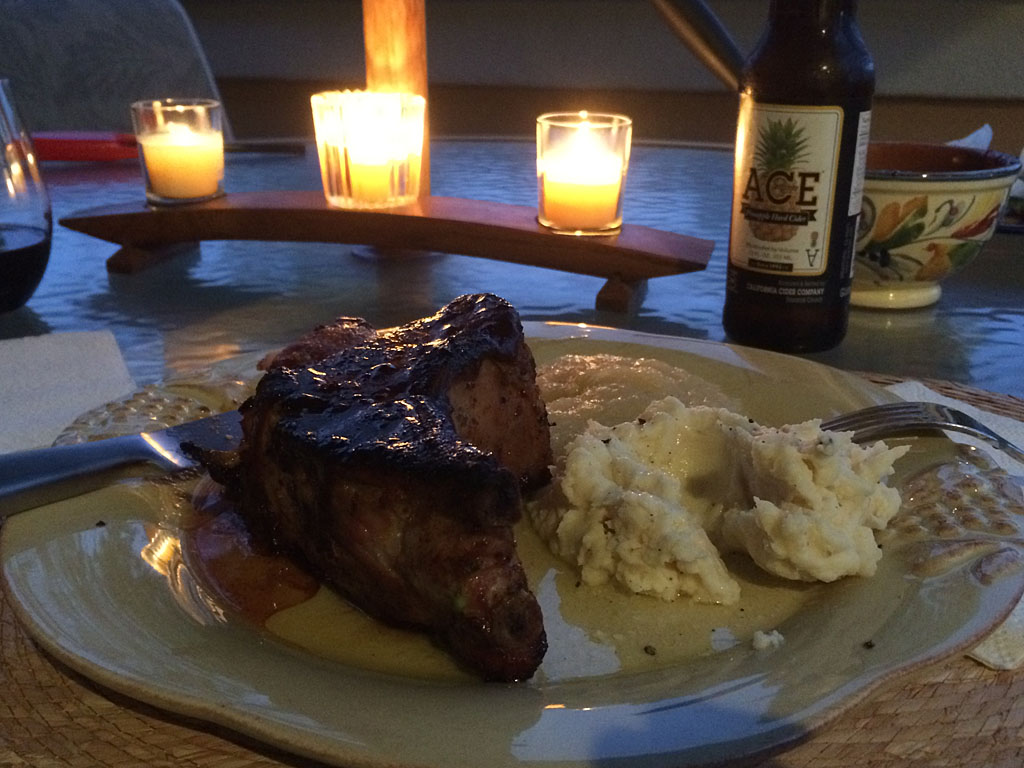
We served these pork chops with mashed potatoes, apple sauce, and a hipster pineapple cider al fresco by candlelight. Couldn’t have asked for a nicer birthday dinner or a more succulent pork chop. I can’t wait to make these again, and I won’t be waiting for another birthday to do so!

Husk-Grilled Corn With Brown Sugar-Cayenne Butter

Husk-grilled corn with brown sugar-cayenne butter

There’s nothing better than summer corn, and unless you’re standing out in a corn field eating it raw, there’s no better way to prepare corn than to grill it.

This recipe for husk-grilled corn comes from Cook’s Country Magazine, June/July 2015. You can follow the basic grilling technique described below and serve with butter, salt and pepper at the dinner table, or you can “guild the lily” by serving the corn with this brown sugar-cayenne butter.

I hope you enjoy it!

Husk-Grilled Corn with Brown Sugar-Cayenne Butter

Ingredients:

  • 6 ears of corn in husks
  • 6 tablespoons unsalted butter, softened
  • 2 Tablespoons packed brown sugar
  • 1/2 teaspoon table salt
  • 1/2 teaspoon coarse black pepper
  • 1/4 teaspoon cayenne pepper

Stir butter, brown sugar, salt, black pepper, and cayenne until smooth and combined.

Butter mixture in foil boat

Make a foil boat to hold the butter mixture: Tear a sheet of heavy duty aluminum foil 12″ x 14″. Fold in half to 12″ x 7″. Roll up sides and crimp to form a boat just big enough to hold an ear of corn.

Place butter mixture into the foil boat.

Preheat your gas grill on HIGH for 15 minutes. Use a grill brush to scrub the grates clean.

Fresh corn goes onto the grill


Corn ready to be shucked

Cut silk from the end of each ear of corn. Put corn straight onto the ripping hot grill and close the lid. Cook 3 minutes, then use long tongs to give the corn a 1/4 turn. Repeat until 4 sides have been grilled, about 12 minutes total time. Corn is cooked when you pull back the husk to reveal steaming corn and bright yellow kernels.

Removing stem from corn

Removing husk with tongs and towel

Remove corn to a cutting board. Cut off the stem ends. Carefully remove husks and silk using tongs and a towel.

Rolling corn in butter mixture

Corn flaring-up on the grill

Roll corn in the butter mixture and return it to the grill with the lid open. The grill may initially flare-up and make some loud popping noises due to the butter. Move the corn around to avoid flames, turning frequently until there is some char, maybe 3-5 minutes max. If you see any soot on the corn due to burned butter from the initial flare-up, gently wipe it off with a towel.

Corn ready to come off the grill

Husk-grilled corn with brown sugar-cayenne butter

Remove corn from the grill. Roll again in the butter mixture. Serve with any leftover butter on the side.

This corn is sweet with a little heat. You may notice a slight caramel corn note. Delicious!